As winter approaches, ensuring your roof is ready to handle cold snaps, wind driven rain, and freeze thaw cycles is crucial for protecting your home. Even in milder Mid Atlantic winters, moisture can work its way into small gaps, then expand as it freezes, which can lead to leaks, staining, and premature wear. The best approach is simple: take care of small maintenance items now, and address any damage early, before the weather makes repairs harder and more expensive. If you want a quick overview of what to check first, start with these Annapolis roofing service options and then work through the steps below.
Use this quick checklist to cover the highest impact items before the first hard freeze.
Inspect and Clean Gutters
One of the most important steps in winter roof prep is ensuring your gutters are clean and free of debris. Clogged gutters can cause water to back up along the roof edge, which increases the risk of ice buildup and hidden moisture damage. Clear out leaves, twigs, and dirt from gutters and downspouts, then run water through the system to confirm it drains quickly and away from the foundation. If you notice sagging sections, loose fasteners, or seams that drip, fix those now, because small alignment issues can become bigger problems once water starts freezing overnight.
It also helps to look at the grading below your downspouts and make sure water is not pooling near the home. If your gutters frequently clog, consider a long term solution such as guards, screens, or upgraded systems, and talk with a pro about the best fit for your roofline and tree cover. Many homeowners choose to combine seasonal cleaning with gutter installation service options or protection systems like Leaf Sentry gutter guards so winter maintenance is easier year after year.
Check for Roof Damage
Before winter settles in, do a careful roof inspection. Look for missing, cracked, or curling shingles, exposed nail heads, soft spots, or granules collecting near downspout exits. Pay special attention to valleys and transitions, because these areas move the most water and are more likely to show early wear. Also check around chimneys, vents, skylights, and pipe boots, since flashing and sealant failures often start there.
From the ground, binoculars can help you spot lifted edges and uneven shingle lines. Inside, take a quick look in the attic or upper ceilings for water stains, damp insulation, or a musty smell after rain. If you see damage, address it quickly, because freeze thaw cycles can turn a small gap into a recurring leak. If repair is needed, a dedicated professional roof repair visit is usually far more cost effective than waiting until moisture spreads into decking, insulation, and drywall.
Pay Special Attention to Flashing and Seals
Many winter leaks do not start in the middle of the roof, they start where the roof meets something else. Flashing is the thin metal material that protects joints around chimneys, dormers, walls, and roof penetrations, and it is one of the most important lines of defense against water intrusion. Look for rust, bent edges, lifted corners, missing fasteners, or cracked sealant around these areas, and check that the flashing lies flat against the surface.
Caulk and sealant can dry out and split over time, especially after hot summers, which makes winter moisture intrusion more likely. Re sealing small gaps early can prevent repeated water entry during storms. If you want to understand the most common weak points and what to look for, review roof flashing basics guide so you know which areas deserve extra attention during your inspection.
Insulate Your Attic
Proper attic insulation is key to preventing heat loss, which can contribute to ice buildup along roof edges. When warm air escapes from your living space into the attic, it warms the roof surface unevenly, which can melt moisture and then allow it to refreeze near colder edges. The result can be trapped water, soaked insulation, and hidden staining that is easy to miss until the problem becomes severe.
Start with simple checks. Make sure attic access doors are sealed, recessed lights are properly rated for attic contact, and bathroom fans vent outside rather than into the attic. Then look at insulation coverage and whether it is consistent across the attic floor. In many homes, adding insulation is only part of the fix, you also want to seal air leaks first so warm air is not continuously flowing upward. If you need a practical overview of why this matters and where homeowners typically lose the most heat, this attic insulation guide is a useful reference as you plan next steps.
Trim Overhanging Branches
Snow, ice, and winter winds can stress tree limbs, and branches that hang over the roofline are a common source of shingle damage. Before winter weather arrives, trim overhanging branches near your home, especially those that rub on shingles or extend over valleys. This helps prevent broken limbs from tearing shingles and reduces the amount of leaves and small debris that collect in gutters.
It also discourages pests from using branches as a bridge onto the roof. While you are outside, check that roof vents are clear and that nothing is blocking intake or exhaust points, since good airflow supports a healthier roof system through temperature swings.
Improve Ventilation to Reduce Moisture and Condensation
Insulation helps control heat loss, but ventilation helps control moisture. In winter, indoor humidity can rise from showers, cooking, and everyday living, and that moisture can migrate into the attic. Without balanced ventilation, condensation can form on cold surfaces, which may lead to damp insulation, mildew odors, and wood rot over time.
A basic way to assess ventilation is to look for signs of condensation such as damp rafters, rusty nail heads, or dark staining on roof decking. If you see these, you may need a better intake and exhaust balance, which can involve soffit vents, ridge vents, or other vent solutions depending on roof design. A professional can evaluate airflow patterns and recommend improvements that fit your roof type.
Prevent Ice Dams and Freeze Thaw Damage
Ice dams are one of the most common winter roof problems because they combine two issues that are easy to overlook: uneven roof temperatures and trapped meltwater. When heat leaks into the attic, the upper portions of the roof can warm enough to melt snow. That water then runs toward colder eaves where it refreezes, gradually building a ridge of ice that blocks drainage. Once that ridge forms, additional meltwater has nowhere to go, so it can back up beneath shingles and into the roof system. The result is often staining on ceilings, damp insulation, and hidden moisture damage that becomes more expensive the longer it goes undetected.
A strong prevention strategy focuses on reducing the conditions that cause melting in the first place. Sealing attic air leaks and improving insulation typically matter more than homeowners expect, because the goal is to keep the roof surface temperature as consistent as possible. Ventilation also plays a supporting role by helping the attic stay closer to the outdoor temperature, which reduces warm spots that trigger melting. Finally, make sure gutters and downspouts are draining properly, because slow drainage encourages refreezing at the roof edge when overnight temperatures drop.
Watch for early warning signs during winter weather. Long icicles can indicate that meltwater is refreezing at the eaves, and patchy snowmelt patterns can suggest uneven heat loss from the attic. Inside the home, stay alert to new stains near exterior walls, bubbling paint, or damp smells after a thaw. If you notice these signs, it is better to address them quickly than to assume they will resolve on their own, because repeated freeze thaw cycles tend to widen small openings and drive moisture deeper into the assembly.
Install a Roof Heating Cable
If your roof has a history of ice buildup along the eaves or you notice recurring winter edging issues, roof heating cables may be worth considering. These cables are installed along roof edges and sometimes inside gutters to help melt snow and reduce refreezing in the most vulnerable spots. They are not a replacement for insulation and ventilation improvements, but they can be helpful for problem areas where the roof design or shading creates stubborn cold zones.
If you explore this option, have a professional confirm the correct placement and ensure the electrical work is handled safely. Improper installation can reduce effectiveness and create avoidable hazards.
Clear Snow Regularly
After significant snowfall, it is smart to remove excess accumulation from roof edges, especially if your home has a low slope section or if snow tends to drift on one side. Heavy snow can add structural stress, and repeated freeze thaw can push moisture into small openings. A roof rake can safely remove snow from the edge while you stay on the ground, and it also helps prevent thick snow from compacting into ice. If your home includes a flatter area, review low slope roof considerations so you know what to monitor during winter storms.
Avoid chipping at ice with tools, because that often damages shingles and removes protective granules. If there is already thick ice, it is usually best to call a professional rather than risk roof damage or personal injury.
Schedule a Professional Inspection
If you are unsure about the condition of your roof or you have not had it checked in a while, a professional inspection is a practical investment before winter weather hits. A contractor can identify subtle issues like lifted flashing, minor shingle failure, poor ventilation balance, or early signs of moisture entry that homeowners often miss. They can also provide a realistic plan for repairs, maintenance, and improvements based on your roof type, age, and seasonal exposure.
If you want to move quickly, contact our team to schedule a roof inspection and handle winter roof prep before the next stretch of freezing nights.
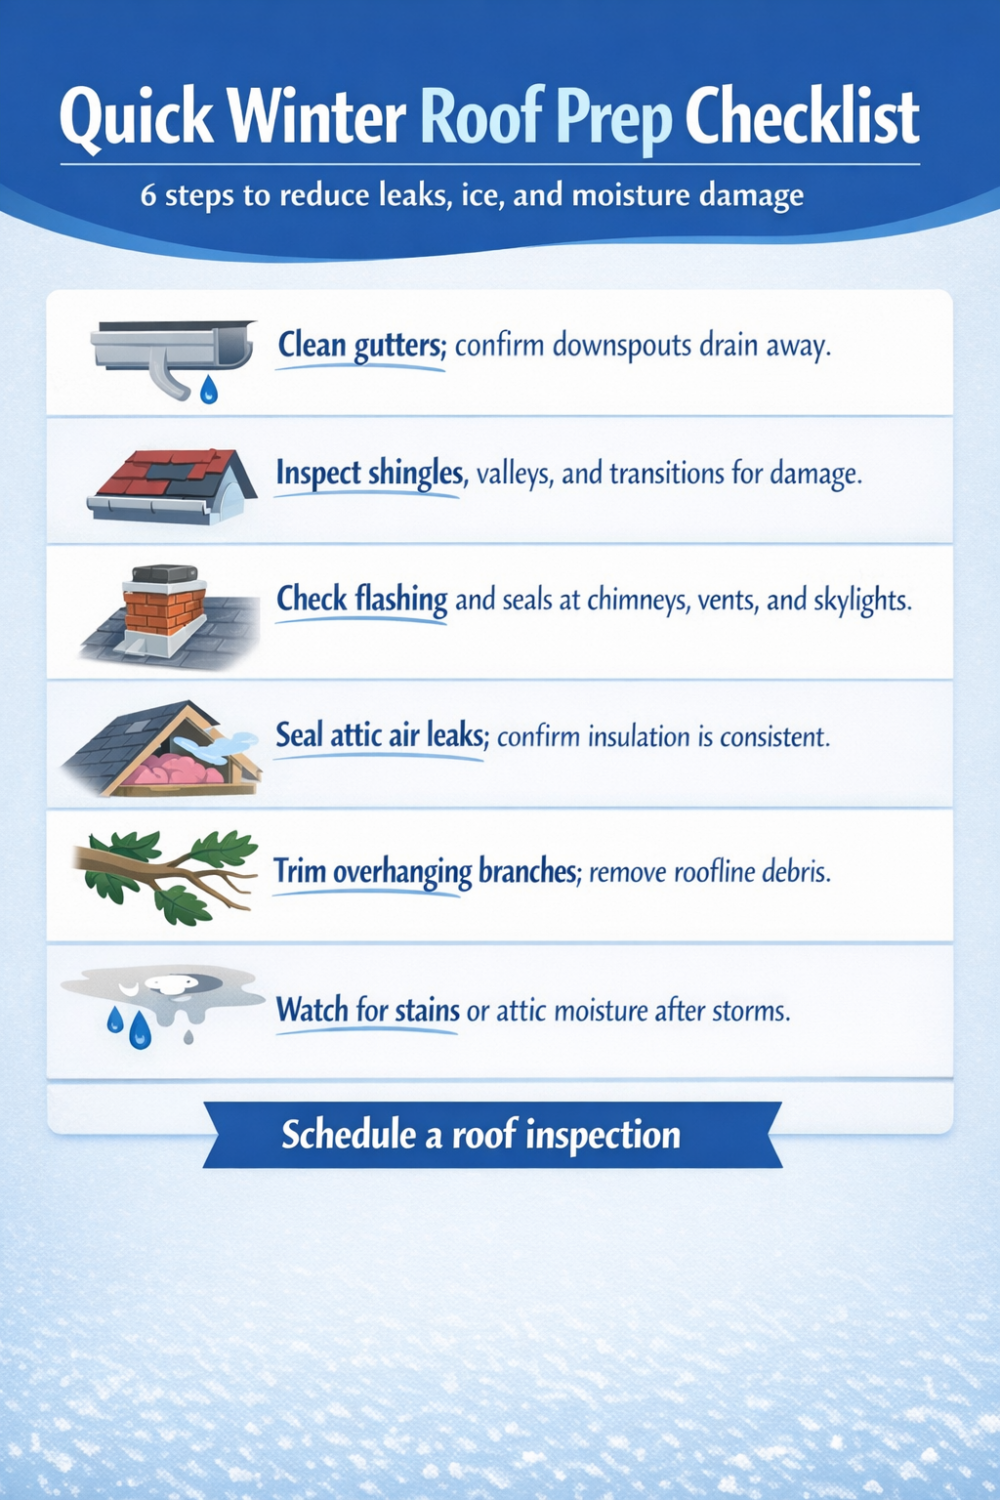
Quick Winter Roof Prep Checklist
Clean gutters and confirm downspouts drain away from the home
Inspect shingles, valleys, and transitions for cracking, lifting, or missing materials
Check flashing and seals at chimneys, vents, skylights, and wall connections
Seal attic air leaks, then confirm insulation coverage is consistent
Trim branches that overhang the roof and remove debris that collects on the roofline
Monitor for interior stains or attic moisture after heavy rain or mixed precipitation